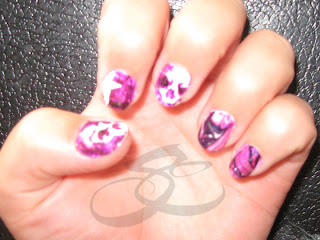
I love creating unique designs for my nails....and skulls! Yes, I have to have one somewhere, a little visual interest. It's like where's Waldo if you look hard enough you'll find a skull or two on me somewhere. So for all the other lovers of skulls and unique nails your in luck, because I actually remembered to take pictures for you guys while I was painting them! Great right?! So hopefully you can get an idea of how its done and create your own.
Paint the nails white. The next step takes some artistic skill, but I use different techniques to create each of the nails. So if creating a skull is to hard for you stay with me, that ones the hardest. They get easier after that.

 On my middle finger I drew the outline of a skull with markers. Pink was used first to draw all the lines. For the areas that need to be darker purple was added on top of the pink. Followed by the black in the darkest areas. The same process was repeated on my thumb.
Once the marker dries added a clear coat. Dab the clear on instead of brushing it on, so the clear coat won't smear the marker.
To create the look on the first finger, take the pink and purple markers and make a camo pattern. Add a clear coat over the camo, brushed it on. This will smear the markers; which will help the pink and purple blend. See the above picture that's what it should look like once its blended.
 Once the clear dries, take a black marker and draw a bunch of random lines on top of the pink and purple. As well as a black French tip. (Sorry, but this is when I stopped taking pictures of the process. I got into creating the look and just totally forgot about it.)Add a clear coat again, this time dab it on so the black will not smear. Wait for it to dry.
The final step is to take white nail polish and a fine tip nail polish brush ( or a craft brush you don't mind ruining) and make a star in the corner of the nail. Once that dries your done with that nail.
I created a camouflage pattern the ring and little finger with markers, but I totally lost interest in drawing anything else. I decided to try a pin I found on Pinterest for the remaining nails. It was a video from YouTube on water marbling!!
I've wanted to experiment with water marbling for awhile. This was the perfect look to do just that. This was my first time trying the water marbling technique. It was harder then I thought! It took a lot of patience to get the hang of it, but I figure it out after a few mess ups.
I used black, pink, and white nail polish to make the marble design. I did my little finger first, thinking it would be easier to take off if I didn't like the way it came out. The nail already had the camo design from the pointer finger on it because, I thought I was going to continue the star design on all the nails. The marble design came out really cool. I did realize that the white
somehow becomes clear when you marble with it. The pink and purple camo shown through all the white spots in the marble. The first attempt didn't have white on it like I wanted, but I still really liked the way it came out, so I left it.
I painted over the camouflage on the ring finger nail. I colored it white and tried marbling again, doing everything I did the first time. This time, because the nail was white instead of camouflage underneath it came out white in the white parts of the marble.... (Hope that's not confusing.)I loved the way this one came out! It was the look I was going for the first time. When both nails dried I added a clear coat. Once that was dry I cleaned up the mess on my skin with a Q-tip and nail polish remover.
I really enjoyed doing the marbling once I got used to it. I don't like how much nail polish it uses up tho. That was really the only downside for me. I really enjoyed this project and I hope it inspired you!
Like/Follow Sherries Customs on....
Instagram
Etsy
Facebook
Pinterest


No comments:
Post a Comment